Resizing images in Rust, now with EXIF orientation support
Resizing an image is one of those programming tasks that seems simple, but has some rough edges. One common mistake is forgetting to handle the EXIF orientation, which can make resized images look very different from the original.
Last year I wrote a create_thumbnail tool to resize images, and today I released a small update. Now it’s aware of EXIF orientation, and it no longer mangles these images. This is possible thanks to a new version of the Rust image crate, which just improved its EXIF support.
What’s EXIF orientation?
Images can specify an orientation in their EXIF metadata, which can describe both rotation and reflection. This metadata is usually added by cameras and phones, which can detect how you’re holding them, and tell viewing software how to display the picture later.
For example, if you take a photo while holding your camera on its side, the camera can record that the image should be rotated 90 degrees when viewed. If you use a front-facing selfie camera, the camera could note that the picture needs to be mirrored.
There are eight different values for EXIF orientation – rotating in increments of 90°, and mirrored or not. The default value is “1” (display as-is), and here are the other seven values:
You can see the EXIF orientation value with programs like Phil Harvey’s exiftool, which helpfully converts the numeric value into a human-readable description:
$ # exiftool's default output is human-readable
$ exiftool -orientation my_picture.jpg
Orientation                     : Rotate 270 CW

$ # or we can get the raw numeric value
$ exiftool -n -orientation my_picture.jpg
Orientation                     : 8
This means that when a program renders my_picture.jpg, it should rotate it 270° clockwise. Compare to the diagram above, and we see that this would rotate the word “FLY” back to the correct upright position.
Resizing images in Rust
I use the image crate to resize images in Rust.
My old code for resizing images would open the image, resize it, then save it back to disk. Here’s a short example:
use image::imageops::FilterType;
use std::error::Error;

fn main() -> Result<(), Box<dyn Error>> {
    // Old method: doesn't know about EXIF orientation
    let img = image::open("original.jpg")?;
    img.resize(180, 120, FilterType::Lanczos3)
        .save("thumbnail.jpg")?;

    Ok(())
}
The thumbnail will keep the resized pixels in the same order as the original image, but the thumbnail doesn’t have the EXIF orientation metadata. This means that if the original image had an EXIF orientation, the thumbnail could look different, because it’s no longer being rotated/reflected properly.
When I wrote create_thumbnail, the image crate didn’t know anything about EXIF orientation – but last week’s v0.25.8 release added several functions related to EXIF orientation. In particular, I can now read the orientation and apply it to an image:
use image::imageops::FilterType;
use image::{DynamicImage, ImageDecoder, ImageReader};
use std::error::Error;

fn main() -> Result<(), Box<dyn Error>> {
    // New methods in image v0.25.8 know about EXIF orientation,
    // and allow us to apply it to the image before resizing.
    let mut decoder = ImageReader::open("original.jpg")?.into_decoder()?;
    let orientation = decoder.orientation()?;
    let mut img = DynamicImage::from_decoder(decoder)?;
    img.apply_orientation(orientation);

    img.resize(180, 120, FilterType::Lanczos3)
        .save("thumbnail.jpg")?;

    Ok(())
}
The thumbnail still doesn’t have any EXIF orientation data, but the pixels have been rearranged so the resized image looks similar to the original. That’s what I want.
Here’s a visual comparison of the three images. Notice how the thumbnail from the old code looks upside down:
 original image original image | 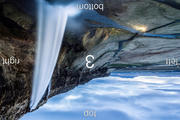 thumbnail from the old code thumbnail from the old code | 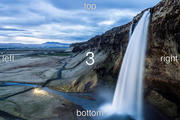 thumbnail from the new code thumbnail from the new code |
This test image comes from Dave Perrett’s exif-orientation-examples repo, which has a collection of images that were very helpful for testing this code.
Is this important?
This is a small change, but it solves an annoyance I’ve hit in every project that deals with images. I’ve written this fix, but images with an EXIF orientation are rare enough that I always forget them when I start a new project – and I used to solve the same problem again and again.
By handling EXIF orientation in create_thumbnail, I won’t have to think about this again. That’s the beauty of a shared tool – I fix it once, and then it’s fixed for all my current and future projects.