How I create static websites for tiny archives
Last year I wrote about using static websites for tiny archives. The idea is that I create tiny websites to store and describe my digital collections. There are several reasons I like this approach: HTML is flexible and lets me display data in a variety of ways; it’s likely to remain readable for a long time; it lets me add more context than a folder full of files.
I’m converting more and more of my local data to be stored in static websites – paperwork I’ve scanned, screenshots I’ve taken, and web pages I’ve bookmarked. I really like this approach.
I got a lot of positive feedback, but the most common reply was “please share some source code”. People wanted to see examples of the HTML and JavaScript I was using.
I deliberately omitted any code from the original post, because I wanted to focus on the concept, not the detail. I was trying to persuade you that static websites are a good idea for storing small archives and data sets, and I didn’t want to get distracted by the implementation.
There’s also no single code base I could share – every site I build is different, and the code is often scrappy or poorly documented. I’ve built dozens of small sites this way, and there’s no site that serves as a good example of this approach – they’re all built differently, implement a subset of my ideas, or have hard-coded details. Even if I shared some source code, it would be difficult to read or understand what’s going on.
However, there’s clearly an appetite for that sort of explanation, so this follow-up post will discuss the “how” rather than the “why”. There’s a lot of code, especially JavaScript, which I’ll explain in small digestible snippets. That’s another reason I didn’t describe this in the original post – I didn’t want anyone to feel overwhelmed or put off. A lot of what I’m describing here is nice-to-have, not essential. You can get started with something pretty simple.
I’ll go through a feature at a time, as if we were building a new static site. I’ll use bookmarks as an example, but there’s nothing in this post that’s specific to bookmarking.
If you’d like to see everything working together, check out the demo site. It includes the full code for all the sections in this post.
Let’s dive in!
- Start with a hand-written HTML page (demo)
- Reduce repetition with JavaScript templates (demo)
- Add filtering to find specific items (demo)
- Introduce sorting to bring order to your data (demo)
- Use pagination to break up long lists (demo)
- Provide feedback with loading states and error handling (demo 1, demo 2)
- Test the code with QUnit and Playwright
- Manipulate the metadata with Python
- Store the website code in Git
- Closing thoughts
Start with a hand-written HTML page (demo)
A website can be a single HTML file you edit by hand. Open a text editor like TextEdit or Notepad, copy-paste the following text, and save it in a file named bookmarks.html.
<h1>Bookmarks</h1>

<ul>
  <li><a href="https://estherschindler.medium.com/the-old-family-photos-project-lessons-in-creating-family-photos-that-people-want-to-keep-ea3909129943">Lessons in creating family photos that people want to keep, by Esther Schindler (2018)</a></li>
  <li><a href="https://www.theatlantic.com/technology/archive/2015/01/why-i-am-not-a-maker/384767/">Why I Am Not a Maker, by Debbie Chachra (The Atlantic, 2015)</a></li>
  <li><a href="https://meyerweb.com/eric/thoughts/2014/06/10/so-many-nevers/">So Many Nevers, by Eric Meyer (2014)</a></li>
</ul>
If you open this file in your web browser, you’ll see a list of three links. You can also check out my demo page to see this in action.
This is an excellent way to build a website. If you stop here, you’ve got all the flexibility and portability of HTML, and this file will remain readable for a very long time.
I build a lot of sites this way. I like it for small data sets that I know are never going to change, or which change very slowly. It’s simple, future-proof, and easy to edit if I ever need to.
Reduce repetition with JavaScript templates (demo)
As you store more data, it gets a bit tedious to keep copying the HTML markup for each item. Wouldn’t it be useful if we could push it into a reusable template?
When a site gets bigger, I convert the metadata into JSON, then I use JavaScript and template literals to render it on the page.
Let’s start with a simple example of metadata in JSON. My real data has more fields, like date saved or a list of keyword tags, but this is enough to get the idea:
const bookmarks = [
  {
    "url": "https://estherschindler.medium.com/the-old-family-photos-project-lessons-in-creating-family-photos-that-people-want-to-keep-ea3909129943",
    "title": "Lessons in creating family photos that people want to keep, by Esther Schindler (2018)"
  },
  {
    "url": "https://www.theatlantic.com/technology/archive/2015/01/why-i-am-not-a-maker/384767/",
    "title": "Why I Am Not a Maker, by Debbie Chachra (The Atlantic, 2015)"
  },
  {
    "url": "https://meyerweb.com/eric/thoughts/2014/06/10/so-many-nevers/",
    "title": "So Many Nevers, by Eric Meyer (2014)"
  }
];
Then I have a function that renders the data for a single bookmark as HTML:
function Bookmark(bookmark) {
  return `
    <li>
      <a href="${bookmark.url}">${bookmark.title}</a>
    </li>
  `;
}
Having a function that returns HTML is inspired by React and Next.js, where code is split into “components” that each render part of the web app.
This function is simpler than what you’d get in React. Part of React’s behaviour is that it will re-render the page if the data changes, but my function won’t do that. That’s okay, because my data isn’t going to change. The HTML gets rendered once when the page loads, and that’s enough.
I’m using a template literal because I find it simple and readable. It looks pretty close to the actual HTML, so I have a pretty good idea of what’s going to appear on the page.
Template literals are dangerous if you’re getting data from an untrusted source – it could allow somebody to inject arbitrary HTML into your page – but I’m writing all my metadata, so I trust it.
I know there are other ways to construct HTML in JavaScript, like document.createElement(), the <template> element, or Web Components – but template literals have always been sufficient for me, and I’ve never had a reason to explore other options.
Now we have to call this function when the page loads, and render the list of bookmarks. Here’s the rest of the code:
<script>
  window.addEventListener("DOMContentLoaded", () => {
    document.querySelector("#listOfBookmarks").innerHTML =
      bookmarks.map(Bookmark).join("");
  });
</script>

<h1>Bookmarks</h1>

<ul id="listOfBookmarks"></ul>
I’m listening for the DOMContentLoaded event, which occurs when the HTML page has been fully parsed. When that event occurs, it looks for <ul id="listOfBookmarks"> in the page, and inserts the HTML for the list of bookmarks.
We have to wait for this event so the <ul> actually exists. If we tried to run it immediately, it might run before the <ul> exists, and then it wouldn’t know where to insert the HTML.
I’m using querySelector() to find the <ul> I want to modify – this is a newer alternative to functions like getElementById(). It’s quite flexible, because I can target any CSS selector, and I find CSS rules easier to remember than the family of getElementBy* functions. Although it’s slightly slower in benchmarks, the difference is negligible and it’s easier for me to remember.
If you want to see this page working, check out the demo page.
I use this pattern as a starting point for a lot of my static sites – metadata in JSON, some functions that render HTML, and an event listener that renders the whole page after it loads.
Once I have the basic site, I add data, render more HTML, and write CSS styles to make it look pretty. This is where I can have fun, and really customise each site. I keep tweaking until I have something I like. I’m ignoring CSS because that could be a whole other post, and there’s a vintage charm to unstyled HTML – it’s fine for what we’re discussing today.
What else can we do?
Add filtering to find specific items (demo)
As the list gets even longer, it’s useful to have a way to find specific items in the list – I don’t want to scroll the whole thing every time. I like adding keyword tags to my data, and then filtering for items with particular tags. If I add other metadata fields, I could filter on those too.
Here’s a brief sketch of the sort of interface I like:
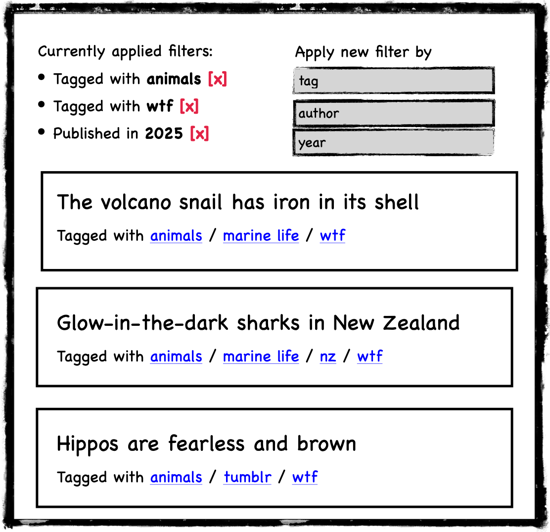
I like to be able to define a series of filters, and apply them to focus on a specific subset of items. I like to combine multiple filters to refine my search, and to see a list of applied filters with a way to remove them, if I’ve filtered too far. I like to apply filters from a global menu, or to use controls on each item to find similar items.
I use URL query parameters to store the list of currently-applied filters, for example:
bookmarks.html?tag=animals&tag=wtf&publicationYear=2025This means that any UI element that adds or removes a filter is a link to a new URL, so clicking it loads a new page, which triggers a complete re-render with the new filters.
When I write filtering code, I try to make it as easy as possible to define new filters. Every site needs a slightly different set of filters, but the overall principle is always the same: here’s a long list of items, find the items that match these rules.
Let’s start by expanding our data model to include a couple of new fields:
const bookmarks = [
  {
    "url": "https://estherschindler.medium.com/the-old-family-photos-project-lessons-in-creating-family-photos-that-people-want-to-keep-ea3909129943",
    "title": "Lessons in creating family photos that people want to keep, by Esther Schindler (2018)",
    "tags": ["photography", "preservation"],
    "publicationYear": "2018"
  },
  …
];
Then we can define some filters we might use to narrow the list:
const bookmarkFilters = [
  {
    id: 'tag',
    label: 'tagged with',
    filterFn: (bookmark, tagName) => bookmark.tags.includes(tagName),
  },
  {
    id: 'publicationYear',
    label: 'published in',
    filterFn: (bookmark, year) => bookmark.publicationYear === year,
  },
];
Each filter has three fields:
idmatches the name of the associated URL query parameterlabelis how the filter will be described in the list of applied filtersfilterFnis a function that takes two arguments: a bookmark, and a filter value, and returns true/false depending on whether the bookmark matches this filter
This list is the only place where I need to customise the filters for a particular site; the rest of the filtering code is completely generic. This means there’s only one place I need to make changes if I want to add or remove filters.
The next piece of the filtering code is a generic function that filters a list of items, and takes the list of filters as an argument:
/*
 * Filter a list of items.
 *
 * This function takes the list of items and available filters, and the
 * URL query parameters passed to the page.
 *
 * This function returns a list with the items that match these filters,
 * and a list of filters that have been applied.
 */
function filterItems({ items, filters, params }) {

  // By default, all items match, and no filters are applied.
  var matchingItems = items;
  var appliedFilters = [];

  // Go through the URL query params one by one, and look to
  // see if there's a matching filter.
  for (const [key, value] of params) {
    console.debug(`Checking query parameter ${key}`);
    const matchingFilter = filters.find(f => f.id === key);

    if (typeof matchingFilter === 'undefined') {
      continue;
    }

    // There's a matching filter!  Go ahead and filter the
    // list of items to only those that match.
    console.debug(`Detected filter ${JSON.stringify(matchingFilter)}`);

    matchingItems = matchingItems.filter(
      item => matchingFilter.filterFn(item, value)
    );

    // Construct a new query string that doesn't include
    // this filter.
    const altQuery = new URLSearchParams(params);
    altQuery.delete(key, value);
    const linkToRemove = "?" + altQuery.toString();

    appliedFilters.push({
      type: matchingFilter.id,
      label: matchingFilter.label,
      value,
      linkToRemove,
    })
  }

  return { matchingItems, appliedFilters };
}
This function doesn’t care what sort of items I’m passing, or what the actual filters are, so I can reuse it between different sites. It returns the list of matching items, and the list of applied filters. The latter allows me to show that list on the page.
linkToRemove is a link to the same page with this filter removed, but keeping any other filters. This lets us provide a button that removes the filter.
The final step is to wire this filtering into the page render. We need to make sure we only show items that match the filter, and show the user a list of applied filters. Here’s the new code:
<script>
  window.addEventListener("DOMContentLoaded", () => {
    const params = new URLSearchParams(window.location.search);

    const { matchingItems: matchingBookmarks, appliedFilters } =
      filterItems({
        items: bookmarks,
        filters: bookmarkFilters,
        params,
      });

    document.querySelector("#appliedFilters").innerHTML =
      appliedFilters
        .map(f => `<li>${f.label}: ${f.value} <a href="${f.linkToRemove}">(remove)</a></li>`)
        .join("");

    document.querySelector("#listOfBookmarks").innerHTML =
      matchingBookmarks.map(Bookmark).join("");
  });
</script>

<h1>Bookmarks</h1>

<p>Applied filters:</p>
<ul id="appliedFilters"></ul>

<p>Bookmarks:</p>
<ul id="listOfBookmarks"></ul>
I stick to simple filters that can be phrased as a yes/no question, and I rely on my past self to have written sufficiently useful metadata. At least in static sites, I’ve never implemented anything like a fuzzy text search, where it’s less obvious whether a particular item should match.
You can check out the filtering code on the demo page.
Introduce sorting to bring order to your data (demo)
The next feature I usually implement is sorting. I build a dropdown menu with all the options, and picking one reloads the page with the new sort order. Here’s a quick design sketch:
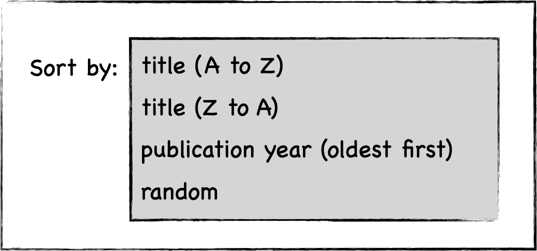
For example, I often sort by the date I saved an item, so I can find an item I saved recently. Another sort order I often use is “random”, which shuffles the items and is a fun way to explore the data.
As with filters, I put the current sort order in a query parameter, for example:
bookmarks.html?sortOrder=titleAtoZAs before, I want to write this in a generic way and share code between different sites. Let’s start by defining a list of sort options:
const bookmarkSortOptions = [
  {
    id: 'titleAtoZ',
    label: 'title (A to Z)',
    compareFn: (a, b) => a.title > b.title ? 1 : -1,
  },
  {
    id: 'publicationYear',
    label: 'publication year (newest first)',
    compareFn: (a, b) => Number(b.publicationYear) - Number(a.publicationYear),
  },
];
Each sort option has three fields:
idis the value that will appear in the URL query parameterlabelis the human-readable label that will appear in the dropdowncompareFn(a, b)is a function that compares two items, and will be passed directly to the JavaScriptsortfunction. If it returns a negative value, thenasorts beforeb. If it returns a positve value, thenasorts afterb.
Next, we can define a function that will sort a list of items:
/*
 * Sort a list of items.
 *
 * This function takes the list of items and available options, and the
 * URL query parameters passed to the page.
 *
 * It returns a list with the items in sorted order, and the
 * sort order that was applied.
 */
function sortItems({ items, sortOptions, params }) {

  // Did the user pass a sort order in the query parameters?
  const sortOrderId = getSortOrder(params);

  // What sort order are we using?
  //
  // Look for a matching sort option, or use the default if the sort
  // order is null/unrecognised.  For now, use the first defined
  // sort order as the default.
  const defaultSort = sortOptions[0];
  const selectedSort =
    sortOptions.find(s => s.id === sortOrderId) || defaultSort;

  console.debug(`Selected sort: ${JSON.stringify(selectedSort)}`);

  // Now apply the sort to the list of items.
  const sortedItems = items.sort(selectedSort.compareFn);

  return { sortedItems, appliedSortOrder: selectedSort };
}

/* Get the current sort order from the URL query parameters. */
function getSortOrder(params) {
  return params.get("sortOrder");
}
This function works with any list of items and sort orders, making it easy to reuse across different sites. I only have to define the list of sort orders once.
This approach makes it easy to add new sort orders, and to write a component that renders a dropdown menu to pick the sort order:
/*
 * Create a dropdown control to choose the sort order.  When you pick
 * a different value, the page reloads with the new sort.
 */
function SortOrderDropdown({ sortOptions, appliedSortOrder }) {
  return `
    <select onchange="setSortOrder(this.value)">
      ${
        sortOptions
          .map(({ id, label }) => `
            <option value="${id}" ${id === appliedSortOrder.id ? 'selected' : ''}>
              ${label}
            </option>
          `)
          .join("")
      }
    </select>
  `;
}

function setSortOrder(sortOrderId) {
  const params = new URLSearchParams(window.location.search);
  params.set("sortOrder", sortOrderId);
  window.location.search = params.toString();
}
Finally, we can wire the sorting code into the rest of the app. After filtering, we sort the items and then render the sorted list. We also show the sort controls on the page:
<script>
  window.addEventListener("DOMContentLoaded", () => {
    const params = new URLSearchParams(window.location.search);

    const { matchingItems: matchingBookmarks, appliedFilters } =
      filterItems(…);

    …

    const { sortedItems: sortedBookmarks, appliedSortOrder } =
      sortItems({
        items: matchingBookmarks,
        sortOptions: bookmarkSortOptions,
        params,
      });

    document.querySelector("#sortOrder").innerHTML +=
      SortOrderDropdown({ sortOptions: bookmarkSortOptions, appliedSortOrder });

    document.querySelector("#listOfBookmarks").innerHTML =
      sortedBookmarks.map(Bookmark).join("");
  });
</script>

<p id="sortOrder">Sort by:</p>
You can check out the sorting code on the demo page.
Use pagination to break up long lists (demo)
If you have a really long list of items, you may want to break them into multiple pages.
This isn’t something I do very often. Modern web browsers are very performant, and you can put thousands of elements on the page without breaking a sweat. I’ve only had to add pagination in a couple of very image-heavy sites – if it’s a text-based site, I just show everything. (You may notice that, for example, there are no paginated lists anywhere on this site. By writing lean HTML, I can fit all my lists on a single page.)
If I do want pagination, I stick to a classic design:

As with other features, I use a URL query parameter to track the current page number:
bookmarks.html?pageNumber=2This code can be written in a completely generic way – it doesn’t have to care what sort of items we’re paginating.
First, let’s write a function that will select a page of items for us. If we’re on page N, what items should we be showing?
/*
 * Get a page of items.
 *
 * This function will reduce the list of items to the items that should
 * be shown on this particular page.
 */
function paginateItems({ items, pageNumber, pageSize }) {

  // Page numbers are 1-indexed, so page 1 corresponds to
  // the indices 0…(pageSize - 1).
  const startOfPage = (pageNumber - 1) * pageSize;
  const endOfPage = pageNumber * pageSize;
  const thisPage = items.slice(startOfPage, endOfPage);

  return {
    thisPage,
    totalPages: Math.ceil(items.length / pageSize),
  };
}
In some of my sites, the page size is a suggestion rather than a hard rule. If there are 27 items and the page size is 25, I think it’s nicer to show all the items on one page than push a few items onto a second page which barely has anything on it. But that might reflect my general dislike of pagination, and it’s definitely a nice-to-have rather than a required feature.
Once we know what page we’re on and how many pages there are, we can create a component to render some basic pagination controls:
/*
* Renders a list of pagination controls.
*
* This includes links to prev/next pages and the current page number.
*/
function PaginationControls({ pageNumber, totalPages, params }) {
// If there are no pages, we don't need pagination controls.
if (totalPages === 1) {
return "";
}
// Do we need a link to the previous page? Only if we're past page 1.
if (pageNumber > 1) {
const prevPageUrl = setPageNumber({ params, pageNumber: pageNumber - 1 });
prevPageLink = `<a href="${prevPageUrl}">← prev</a>`;
} else {
prevPageLink = null;
}
// Do we need a link to the next page? Only if we're before
// the last page.
if (pageNumber < totalPages) {
const nextPageUrl = setPageNumber({ params, pageNumber: pageNumber + 1 });
nextPageLink = `<a href="${nextPageUrl}">next →</a>`;
} else {
nextPageLink = null;
}
const pageText = `Page ${pageNumber} of ${totalPages}`;
// Construct the final result.
return [prevPageLink, pageText, nextPageLink]
.filter(p => p !== null)
.join(" / ");
}
/* Returns a URL that points to the new page number. */
function setPageNumber({ params, pageNumber }) {
const updatedParams = new URLSearchParams(params);
updatedParams.set("pageNumber", pageNumber);
return `?${updatedParams.toString()}`;
}Finally, let’s wire this code into the rest of the app. We get the page number from the URL query parameters, paginate the list of filtered and sorted items, and show some pagination controls:
<script>
  /* Get the current page number. */
  function getPageNumber(params) {
    return Number(params.get("pageNumber")) || 1;
  }

  window.addEventListener("DOMContentLoaded", () => {
    const params = new URLSearchParams(window.location.search);

    const { matchingItems: matchingBookmarks, appliedFilters } =
      filterItems(…);

    const { sortedItems: sortedBookmarks, appliedSortOrder } =
      sortItems(…);

    const pageNumber = getPageNumber(params);

    const { thisPage: thisPageOfBookmarks, totalPages } =
      paginateItems({
        items: sortedBookmarks,
        pageNumber,
        pageSize: 25,
      });

    document.querySelector("#paginationControls").innerHTML +=
      PaginationControls({ pageNumber, totalPages, params });

    document.querySelector("#listOfBookmarks").innerHTML =
      thisPageOfBookmarks.map(Bookmark).join("");
  });
</script>

<p id="paginationControls">Pagination controls: </p>
One thing that makes pagination a little tricky is that it affects filtering and sorting as well – when you change either of those, you probably want to reset to the first page.
For example, if you’re filtering for animals and you’re on page 3, then you add a second filter for giraffes, you should reset to page 1. If you stay on page 3, it might be confusing if there are less than 3 pages of results with the new filter.
The key to this is calling params.delete("pageNumber") when you update the URL query parameters.
You can play with the pagination on the demo page.
Provide feedback with loading states and error handling (demo 1, demo 2)
One problem with relying on JavaScript to render the page is that sometimes JavaScript goes wrong. For example, I write a lot of my metadata by hand, and a typo can create invalid JSON and break the page. There are also people who disable JavaScript, or sometimes it just doesn’t work.
If I’m using the site, I can open the Developer Tools in my web browser and start debugging there – but that’s not a great experience. If you’re not expecting something to go wrong, it will just look like the page is taking a long time to load. We can do better.
To start, we can add a <noscript> element that explains to users that they need to enable JavaScript. This will only be shown if they’ve disabled JavaScript:
<noscript>
  <strong>You need to enable JavaScript to use this site!</strong>
</noscript>
I have a demo page which disables JavaScript, so you can see how the noscript tag behaves.
This won’t help if JavaScript is broken rather than disabled, so we also need to add error handling. We can listen for the error event on the window, and report an error to the user – for example, if a script fails to load.
<div id="errors"></div>

<script>
  window.addEventListener("error", function(event) {
    document
      .querySelector('#errors')
      .innerHTML = `<strong>Something went wrong when loading the page!</strong>`;
  });
</script>
We can also attach an onerror handler to specific script tags, which allows us to customise the error message – we can tell the user that a particular file failed to load.
<script src="app.js" onerror="alert('Something went wrong while loading app.js')"></script>I have another demo page which has a basic error handler.
Finally, I like to include a loading indicator, or some placeholder text that will be replaced when the page will finish loading – this tells the user where they can expect to see something load in.
<ul id="listOfBookmarks">Loading…</ul>It’s somewhat rare for me to add a loading indicator or error handling, just because I’m the only user of my static sites, and it’s easier for me to use the developer tools when something breaks. But providing mechanisms for the user to understand what’s going on is crucial if you want to build static sites like this that other people will use.
Test the code with QUnit and Playwright
If I’m writing a very complicated viewer, it’s helpful to have tests. I’ve found two test frameworks that I particularly like for this purpose.
QUnit is a JavaScript library that I use for unit testing – to me, that means testing individual functions and components. For example, QUnit was very helpful when I was writing the early iterations of the sorting and filtering code, and writing tests caught a number of mistakes.
You can run QUnit in the browser, and it only requires two files, so I can test a project without creating a whole JavaScript build system or dependency tree.
Here’s an example of a QUnit test:
QUnit.test("sorts bookmarks by title", function(assert) {
  // Create three bookmarks with different titles
  const bookmarkA = { title: "Almanac for apples" };
  const bookmarkC = { title: "Compendium of coconuts" };
  const bookmarkP = { title: "Page about papayas" };

  const params = new URLSearchParams("sortOrder=titleAtoZ");

  // Pass the bookmarks in the wrong order, so they can't be sorted
  // correctly "by accident"
  const { sortedItems, appliedSortOrder } = sortItems({
    items: [bookmarkC, bookmarkA, bookmarkP],
    sortOptions: bookmarkSortOptions,
    params,
  });

  // Check the bookmarks have been sorted in the right order
  assert.deepEqual(sortedItems, [bookmarkA, bookmarkC, bookmarkP]);
});
You can see this test running in the browser in my demo page.
Playwright is a testing library that can open a web app in a real web browser, interact with the page, and check that the app behaves correctly. It’s often used for dynamic web apps, but it works just as well for static pages. For example, it can test that if you select a new sort order, the page reloads and show results in the correct order.
Here’s an example of a simple test written with Playwright in Python:
from playwright.sync_api import expect, sync_playwright

with sync_playwright() as p:
    browser = p.webkit.launch()

    # Open the HTML file in the browser
    page = browser.new_page()
    page.goto('file:///Users/alexwlchan/Sites/sorting.html')

    # Look for an <li> element with one of the bookmarks -- this will
    # only appear if the page has rendered correctly.
    expect(page.get_by_text("So Many Nevers")).to_be_visible()

    browser.close()
These tools are a great safety net for catching mistakes, but I don’t always need them.
I only write tests for my more complicated sites – when the sorting/filtering code is particularly complex, there’s a lot of rendering code, or I anticipate making major changes in future. I don’t bother with tests when the site is simple and unlikely to change, and I can just do manual checks when I write it the first time. Tests are less useful if I know I’ll never make changes.
This is getting away from the idea of a self-contained static website, because now I’m relying on third-party code, and for Playwright I need to maintain a working Python environment. I’m okay with this, because the website is still usable even if I can no longer run the tests. These are useful sidecar tools, but I only need them if I’m making changes.
If I finish a site and I know I won’t change it again, I don’t need to worry about whether the tests will still work years later.
Manipulate the metadata with Python
For small sites, we could write all this JavaScript directly in <script> tags or in a single file. As we get more data, splitting the metadata and application logic makes everything easier to manage.
One pattern I’ve adopted is to put all the item metadata into a single, standalone JavaScript file that assigns a single variable:
const bookmarks = […];and then load that file in the HTML page with a <script src="metadata.js"> element.
I use JavaScript rather than pure JSON because browsers don’t allow fetching local JSON files via file://. If you open an HTML page without a web server, the browser will block requests to fetch a JSON file because of security restrictions. By storing data in a JavaScript file instead, I can load it with a simple <script> tag.
I wrote a small Python library javascript-data-files that lets me interact with JSON stored this way. This allows me to write scripts that add data to the metadata file (like saving a new bookmark) or to verify the existing metadata (like checking that I have an archived copy of every bookmark). I’ll write more about this in future posts, because this one is long enough already.
For example, let’s add a new bookmark to the metadata.js file:
from javascript_data_files import read_js, write_js

bookmarks = read_js("metadata.js", varname="bookmarks")

bookmarks.append({
  "url": "https://www.theguardian.com/lifeandstyle/2019/jan/13/ella-risbridger-john-underwood-friendship-life-new-family",
  "title": "When my world fell apart, my friends became my family, by Ella Risbridger (2019)"
})

write_js("metadata.js", varname="bookmarks", value=bookmarks)
We’re starting to blur the line between a static site and a static site generator. These scripts only work if I have a working Python environment, which is less future-proof than pure HTML. I’m happy with this compromise, because the website is fully functional without them – I only need to run these scripts if I’m modifying the metadata.
If I stop making changes and the Python environment breaks, I can still read everything I’ve already saved.
Store the website code in Git
I create Git repositories for all of my local websites. This allows me to track changes, and it means I can experiment freely – I can always roll back if I break something.
These Git repositories only live on my local machine. I run git init . in the folder, I create commits to record any changes, and that’s it. I don’t push the repository to GitHub or another remote Git server. (Although I do have backups of every site, of course.)
Git has a lot of features for writing code in a collaborative environment, but I don’t need any of those here – I’m the only person working on these sites. Most of the time, I just use two commands:
$ git add bookmarks.html
$ git commit -m "Add filtering by author"
This creates a labelled snapshot of my latest changes to bookmarks.html.
I only track the text files in Git – the HTML, CSS, and JavaScript. I don’t track binary files like images and videos. Git struggles with those larger files, and I don’t edit those as much as the text files, so having them in version control is less useful. I write a gitignore file to ignore all of them.
Closing thoughts
There are lots of ideas here, but you don’t need to use all of them – most of my sites only use a few. Every site is different, and you can pick what makes most sense for your project.
If you’re building a static site for a tiny archive, start with a simple HTML file. Add features like templates, sorting, and filtering incrementally as they become useful. You don’t need to add them all upfront – that can make things more complicated than they need to be.
This approach can scale from simple collections to sophisticated archives. A static website built with HTML and JavaScript is easy to maintain and modify, has no external dependencies, and is future-proof against a lot of technological changes.
I’ve come to love using static websites to store my local data. They’re flexible, resilient, and surprisingly powerful. I hope you’ll consider it too, and that these ideas help you get started.