Describing all my photos
I take a lot of photos, but I only keep a fraction.
Every week, I go through my camera roll and sort my photos into three buckets: keep, delete, or “needs action” (pictures like paperwork or screenshots that I need to do something with, but don’t want to keep indefinitely). This lets me filter out repetitive, blurry, or uninteresting shots.
A few years ago, I reviewed my entire 30,000 item library and I deleted almost a fifth of my photos, but I haven’t missed any of those photos. If anything, browsing my photo library has been nicer, because the average quality went up. My photo library only contains my best pictures, not just everything I’ve ever taken.
Recently I added a new step: I now write a description for every photo I’m keeping. Typically the description is a sentence or two of context, like what I was doing when I took the photo, or how I felt when I did. A lot of this context isn’t obvious from the image, and over time I forget those details. Sometimes I can piece it together later from my calendar or journal entries, but other times I just have a mystery image and I can’t remember why it was important.
This slows down the review process, but it only takes a minute or so per photo, and each description makes the photo library a more useful visual record of my life. When I revisit those photos, the memory is stronger because I recall more of the context.
This change has forced me to be more thoughtful about which photos I keep. If I can’t write even a sentence or two about what this photo means to me, is it worth keeping? Will I ever look back on it with fondness?
Even this minimal level of descriptive text is quite unusual. When I was working on the Data Lifeboat project, a lot of the early designs were built around rich uploader-supplied metadata, like title and description. These designs fell short in practice, because most people leave them empty. The vast majority of Flickr pictures don’t have a title or description, and those are photos people want to share! (The auto-generated filename from the camera doesn’t count.)
I’ve already written descriptions for about 5% of my photo library, and that number will gradually ratchet up. I’m writing a description for every new photo, and I’m slowly working backwards while the memories are still fresh.
I really recommend writing descriptions for some of your photos, whether that’s in a social media post, your digital photo library, or a printed album. A sentence of context can really anchor a memory.
If you open your own camera roll and look at the last photo you took, do you remember how you felt in that moment – or is it already starting to slip away?
Building it into Blink
Initially I was adding descriptions using Apple’s Photos app, but I really wanted to include them in Blink – a tiny Mac app I wrote a few years ago to review my photos. Blink lets me sort my library entirely using keyboard shortcuts, and I wanted to write descriptions without breaking that fast, mouse-free flow.
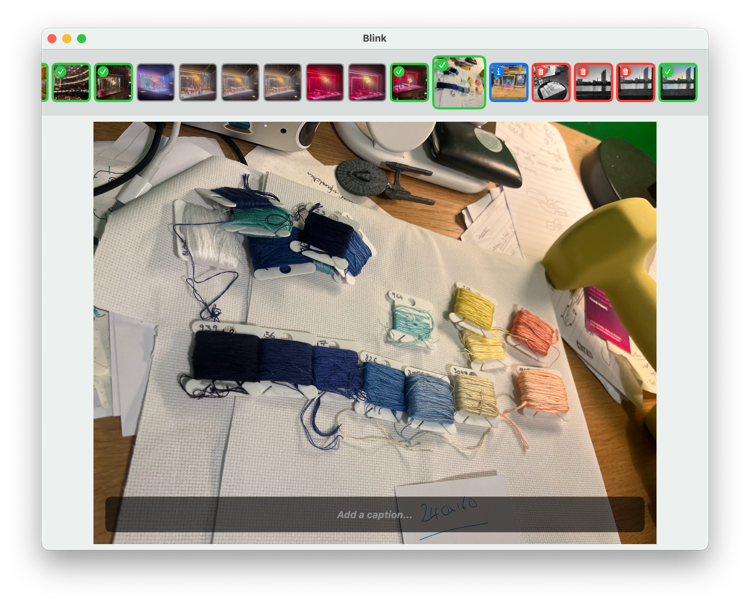
The Blink interface is intentionally sparse: there’s a horizontal thumbnail strip at the top, then the focused photo takes up most of the window. I use arrow keys to switch between photos, and I press 1/2/3 to categorise them (keep/delete/needs action).
To add descriptions, I added an overlay at the bottom of the window. It shows the current caption, or a placeholder if I haven’t set one yet:
If I press space, the overlay switches to a text field where I can enter a new description, or edit the existing description:

When I press ⌘+Enter, the description is saved to the “caption” field in my photo library. I never have to take my hands off the keyboard, so this doesn’t introduce much friction to my workflow.
Adding this to Blink was a fun exercise in revisiting old code.
Returning to an untouched app
Blink is written as a Swift app using SwiftUI, and this was my first time working with Blink and SwiftUI since September 2023. I’ve written short command-line scripts in Swift in the interim, but not a GUI app.
It took a while to get comfortable working in the Blink codebase again. As always, I wish I’d left more comments and documentation when I wrote this code. Names like FocusedImage or AssetHelpers clearly meant something three years ago, but I’d forgotten the meaning and had to relearn it.
Comments are something I can always get better at. I was fortunate to start my career at a company that had a very verbose commenting style, so I learnt some good habits early, but then I cycled through a few jobs where the standards were more lax, and my comments suffered. I was in the middle of that period in 2023, and the Blink code reflects that. My current workplace has a much stronger commenting culture, and I can feel that muscle strengthening again.
If you read my patch to add captions, you’ll notice it has much more commentary!
Intensely personal software
I consider Blink to be a tremendous success. I’ve used it to review thousands of photos since 2023, transforming my photo library from a digital dumping ground to a curated collection of highlights.
I initially wrote Blink as an experiment to learn SwiftUI and Mac development. I’d have been happy if I never used the code, but instead, it’s become an app I use every week.
As far as I know, nobody else has ever used it. The source code lives in a public repo, but it’s for educational interest rather than distribution. (The code is so tied to my machine that it crashes if pointed at anybody else’s photo library.)
I’ve considered cleaning it up, packaging it, and turning it into a “proper” app that other people could use, but that’s a lot of work I don’t find exciting, and it’s unclear if there’s any interest among people who aren’t me.
For now, Blink will continue to have exactly one user. That user doesn’t need an onboarding flow, a settings screen, or cloud syncing. They just want a keyboard-driven app to curate their photos, and write down the context before the memories disappear. For that user, it’s a five-star app.