Using the Screen Capture API to record a browser window
I was on the Lego website recently, and I enjoyed their animation on their age picker – rather than a plain text field, the numbers are made of Lego bricks that animate into view, accompanied by the sound of bricks snapping together:
I don’t know if this age picker is visible everywhere, or if it’s specifically to deal with online age verification laws in the UK; whatever the purpose, I thought it was cute.
I wanted to save a copy of it, and because it has animation and audio, a static screenshot wouldn’t be enough. It took me a couple of attempts to record it as a video, and in doing so I learnt several new web APIs.
Rejected option #1: use QuickTime screen recording
On macOS, QuickTime Player can make a video recording of your screen. You can select the entire screen, a single window, or a specific area of the screen. I’ve used this a couple of times for bug reports and quick videos, and it works pretty well.
Unfortunately, QuickTime Player isn’t able to record the audio, so it only creates a silent version of the animation. The sounds of bricks snapping together is half the fun!
A quick search suggests there are ways to record screen audio in QuickTime Player, but they all require installing third-party plugins to make my Mac’s audio available as a pseudo-microphone. I’m very picky about what I install, and making a fun video doesn’t justify a new app.
Rejected option #2: use Playwright video recording
One tool I have installed already is Playwright, a framework for automating browsers. I use it to take screenshots and test my websites, and it turns out you can also use it to record videos.
To record a video, you create a new browser context which sets a video directory, interact with the page as normal, then close the context to save the video. Here’s an example using Playwright’s Python library to open my list of articles, then scrolls three times:
from playwright.sync_api import sync_playwright
import time

with sync_playwright() as p:
    browser = p.chromium.launch()

    # Create a new context that sets a video directory
    context = browser.new_context(record_video_dir="videos/")

    # Open my list of articles, then scroll down the page three times
    page = context.new_page()
    page.goto("https://alexwlchan.net/articles/")

    for _ in range(3):
        time.sleep(0.5)
        page.mouse.wheel(0, 250)
        time.sleep(0.5)

    # Close the context, which causes the video to be saved
    context.close()
When you run this script, you get a video in the videos/ directory.
I can imagine this might be useful in a large test suite, especially in a complex multi-step test. When a test fails, you can watch a screen recording of the browser during the test, which could be more informative than a textual log. (Indeed, Playwright has a video=retain-on-failure option which only preserves videos created during failing tests, for precisely this use case.)
I ran into two problems with this approach: like QuickTime, you can’t record screen audio; and you can only record videos at 1× pixel density, which makes a very low-resolution and blurry-looking video on modern screens.
Option #3: use the web’s Screen Capture API
Once again I am reminded that modern web tech is amazing, and web browsers are incredibly capable.
There’s a Screen Capture API to record the screen. You can select a tab, a window, or the entire screen. The feature has limited browser support so I don’t think I’d use it in a big web app, but it’s fine for a one-off screen recording. (I wonder how browser-based video conference apps like Google Meet do screen sharing? Do they use this API, or do they use something with wider support?)
To record video, first we call getDisplayMedia() to get the contents of a tab as a MediaStream. Using the example from the MDN docs:
async function startCapture(displayMediaOptions) {
  let captureStream;

  try {
    captureStream =
      await navigator.mediaDevices.getDisplayMedia(displayMediaOptions);
  } catch (err) {
    console.error(`Error: ${err}`);
  }
  return captureStream;
}

const displayMediaOptions = {
  // Only allow the user to select a single browser tab
  video: { displaySurface: 'browser' },

  // Include the audio from the tab
  audio: true,

  // Offer the current tab as the default capture source
  preferCurrentTab: true,
};

const stream = await startCapture(displayMediaOptions);
When you run this in the DevTools console, it triggers a permissions dialog to confirm you want to start recording the contents of the tab. The JavaScript is running on the current page, so it’s theoretically able to see the stream you’re creating. You have to confirm you’re willing to share the website with itself:
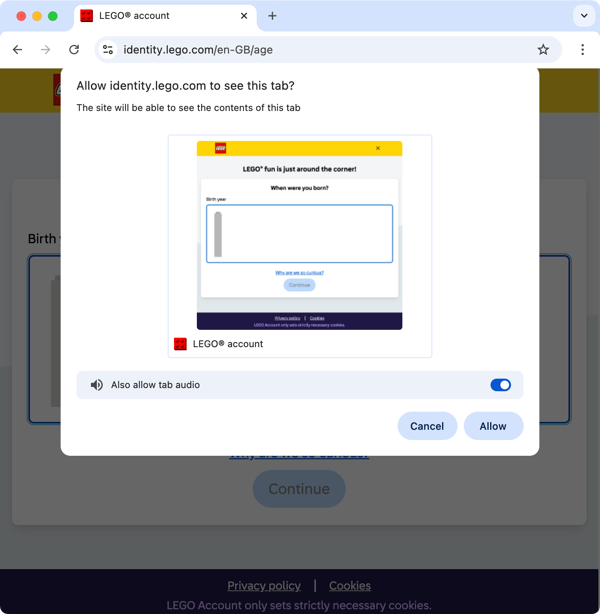
If we didn’t set displaySurface: 'browser', this would offer other options like sharing an arbitrary window or the entire screen. On my Mac, that delegates to an OS-level interface for choosing what to share.
Next, we have to pass the output of the stream to a MediaRecorder:
const mediaRecorder = new MediaRecorder(stream, { mimeType: 'video/mp4' });To store the video data, we create an array, and append to it as we receive dataavailable events:
let videoChunks = [];

mediaRecorder.addEventListener("dataavailable", (ev) => {
  if (ev.data.size > 0) videoChunks.push(ev.data);
})
Now the MediaRecorder is set up, we call the start() method to start writing data to videoChunks. We click and scroll in the browser window to capture whatever it is we want to record. When we’re done, we call stop() to finish the recording:
mediaRecorder.start();

// Do stuff in the browser tab that we want to record

mediaRecorder.stop();
To extract the recorded video data, we can concatenate the video chunks with a Blob object, then use FileReader to output the result as a base64-encoded data URL:
function printDataURL(chunks, mimeType) {
  const blob = new Blob(chunks, { type: mimeType });
  const reader = new FileReader();
  reader.readAsDataURL(blob);
  reader.addEventListener("loadend", () => {
    console.log(reader.result);
  });
}

printDataURL(videoChunks, mediaRecorder.mimeType);
// data:video/mp4;codecs=avc1,opus;base64,AAAAJGZ0eX…
I copy this base64-encoded string out of my DevTools console, save it to an MP4 file, and voila, I have a recording of this Lego age picker – complete with animation and audio.
As I was writing this post, I realised there’s an even smoother method, that saves you copying and base64-decoding the data: URL. Rather than reading the blob using a FileReader, we can create a blob URL that points to the object, then construct and click an <a> tag that downloads the blob:
function downloadVideo(chunks, mimeType) {
  // Construct the blob
  const blob = new Blob(chunks, { type: mimeType });

  // Create a blob URL
  const url = URL.createObjectURL(blob);

  // Create an <a> tag that points to the blob
  const a = document.createElement("a");
  a.href = url;
  a.download = "recording.mp4";

  // Click the <a> tag
  a.click();

  // Wait a second for the download to complete, then release the blob URL
  setTimeout(() => URL.revokeObjectURL(url), 1000);
}

downloadVideo(videoChunks, mediaRecorder.mimeType);
When I run this code, the video gets downloaded as an MP4 file directly to my Downloads folder.
It’s worth noting that when you call MediaRecorder.stop(), it emits a final dataavailable event and then a stop event. If you’re doing this interactively in the DevTools console, the delay between you typing mediaRecorder.stop() and downloadVideo() is plenty for the final chunk to be written to videoChunks. If you’re doing it programatically, you should only download the video when you see the stop event.
To create the video at the top of the post, I wrapped everything in a Python script that used Playwright to run JavaScript on the page, so I’d get consistent timing for the key strokes. The recording isn’t perfect – in particular, there’s a subtle glitch in the appearance of the final “6” – but it’s plenty good enough for a quick video.
I’d also like to work out how this animation works, but that’s a question for another day.