Drawing an image with Liquid Glass using SwiftUI Previews
I used Xcode to create an image with a Liquid Glass effect, then I used the Preview to export it as a standalone file.
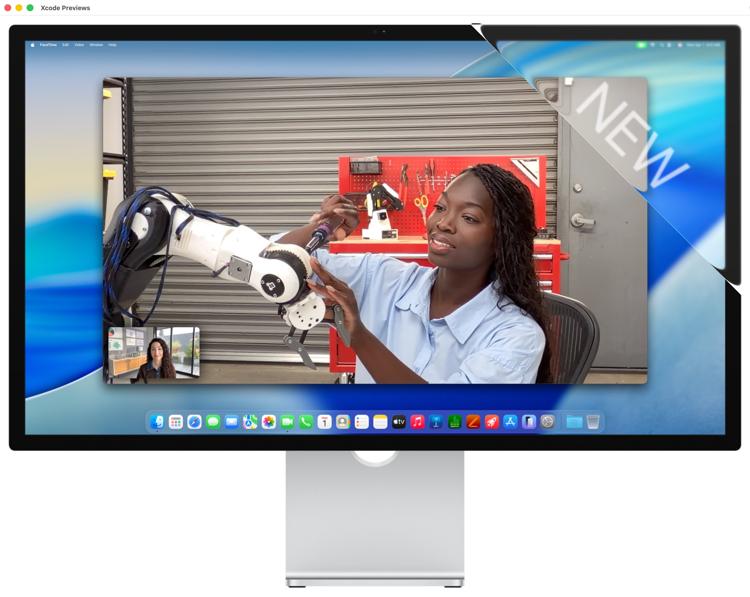
Earlier this week Apple announced a “new” Studio Display which is almost the same as the previous Studio Display, only gaining a better camera and Thunderbolt 5.
Jack Wellborn posted an image on Mastodon joking about the lack of new features – one of Apple’s marketing images overlaid with a blue “new” banner in the corner, which is how Apple’s online store used to highlight new products. The Accidental Tech Podcast used a similar image as their artwork and favicon for years, joking about the lack of updates to the Mac Pro.
I wanted to create a similar image with a “new” banner in the style of Liquid Glass, to make fun of the design problems in macOS Tahoe. Initially I tried creating it in Acorn, but I lack the graphical design skills to replicate the effect – I realised it would be easier to create the effect in code.
I opened Xcode on a Mac running macOS Tahoe and created a new Mac app. I added one of Apple’s marketing images to the Asset catalogue, then I modified the default SwiftUI view ContentView:
import SwiftUI

struct ContentView: View {
    var body: some View {
        VStack {
            Image("center_stage_hw_studio_display__f0h1yn012iie_large_2x")
                .imageScale(.small)
                .foregroundStyle(.tint)
                .overlay(alignment: .topTrailing) {
                    Text("NEW")
                        .font(.title)
                        .foregroundColor(.white)
                        .padding()
                        .frame(width:400, height:5)
                        .glassEffect(.clear, in: Rectangle())
                        .offset(x:150,y:-150)
                        .rotationEffect(.degrees(45))
                        .overlay(alignment: .bottom) {
                            Text("NEW")
                                .font(.system(size: 120))
                                .foregroundColor(.white)
                                .rotationEffect(.degrees(45))
                                .offset(x:-25, y:300)
                                .blur(radius: 1.5)
                                .opacity(0.7)
                        }
                }
                .clipped()
        }
        .padding()
    }
}

#Preview {
    ContentView()
}
I ran Xcode with two panes: my source code on the left, my preview on the right. That worked well for iterating the design, because I could tweak the source code and immediately see the effect.
Even with my limited SwiftUI experience, I know this isn’t very good – for example, I have two Text views, because I couldn’t make the first one work. (Specifically, I couldn’t make it work with glassEffect and rotationEffect – the text was rotated within a horizontal glass container.)
I also couldn’t get the banner to be a thin rectangle; I ended up drawing a large rectangle that clips out of the view (clipped()) and overlaps the entire corner. Let’s retcon that as an homage to the way Tahoe’s UI supposedly “gets out of your way”, but actually takes over even more of your screen.
Rubbish as this code is, it does the trick! And I discovered that Xcode has a menu item to export the SwiftUI Preview as an image: Editor > Canvas > Export Preview Screenshot. I was using Xcode 26; I imagine that menu item might move around in different versions.
Here’s what the output looks like:
I don’t expect to create more images like this, but it’s cool to know I could use Xcode to mock up UI or Liquid Glass quickly, and export my work as images.