Testing JavaScript without a (third-party) framework
Last week Julia Evans posted Writing Javascript without a build system, and it resonated with my own experience. A lot of my websites (including this one) are content sites with just a bit of interactivity sprinkled on top, where I prefer writing vanilla JS over using complex build setups. Even her 400-line script.js would be large by my standards!
One advantage of writing vanilla JS is that it’s easy to return to a project after a long break – you can start editing the JS file straight away, without recreating your build system first.
But whenever I do this, I’m nervous about breaking something. If it’s been months or years since I worked on this code, I’ve forgotten how it works, and I could easily introduce a new bug.
On larger projects, I have test suites to act as my safety net. I make a change, I re-run the tests, and they’ll tell me if I’ve broken anything. But how do I do this with vanilla JavaScript?
I’ve used a variety of JavaScript test frameworks in work projects, including Jest, Jasmine, and Karma – but using them has similar problem to build systems. They all expect to be installed through npm and invoked from the command-line. If I want to run those tests again after a long period away, I need to recreate my working environment.
I’ve built myself a tiny framework that lets me write unit tests for my vanilla JS files. Unlike build systems, where the benefits are marginal for smaller projects, a good test suite can be useful for even the smallest bits of code. I added some basic filters to my book tracker last year, and although the core logic is only ~50 lines of code, writing some tests helped me spot several bugs I’d missed.
My secret trick: use the browser
Whenever you run tests, you need to run code – and browsers are very good at running JavaScript!
I’ve written a couple of helper functions that let me write test cases in an HTML file, and then view the result in a browser. Here’s an example of what a single test case looks like:
<script>
  it('createPublicationYearLabel: a range of years', () => {
    assertEqual(
      createPublicationYearLabel({ afterYear: '2001', beforeYear: '2002' }),
      'published between 2001 and 2002'
    );
  });
</script>
When I open that file in a browser, it runs the test – and the corresponding JavaScript. It then puts the results in the body of the document, so I can quickly see whether anything’s broken:
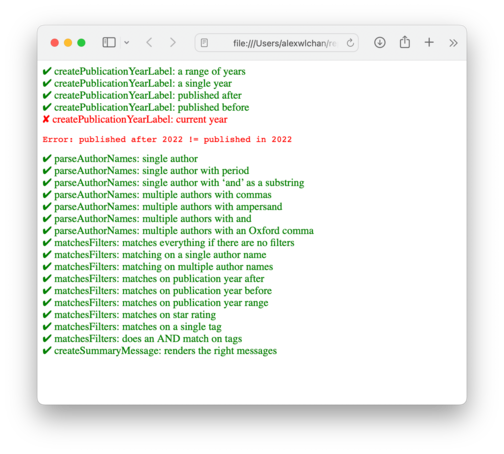
Here a test is failing because it relies on the value of the current year, and I haven’t updated the test since 2022 – but I can see everything else is working.
Let’s see what’s going on here.
A function to test: createPublicationYearLabel
In my book tracker, I can filter by the year in which books were published – for example, if I want to see all the older books I’ve read, or what my favourites were from this year’s new books. The filter allows you to enter a lower bound, an upper bound, or both:
![A popover window labelled 'publication year' and the text 'published between [year] and [year]'. Both the '[year]'s are input fields where a user can type some text.](/images/2023/publication_year_filters_1x.png)
Once I’ve entered a filter, I have a function createPublicationYearLabel which turns it into a human-readable label.
createPublicationYearLabel({ beforeYear: 2001 });
// "published before 2001"

createPublicationYearLabel({ beforeYear: 2001, afterYear: 1990 });
// "published between 1990 and 2001"

createPublicationYearLabel({ afterYear: 2023 });
// "published in 2023"
This is a bit more complicated than published between ${lowerBound} and ${upperBound}'published between 2001 and undefined'.
There’s other logic to handle the case where the lower/upper bounds are the same (I’m looking for books published in a single year) or the lower bound is the current year (I’m looking for new books).
This is a pure function, and so it’s the easiest sort of function to test. This is typical of the sort of thing I test in vanilla JS – a function to manipulate some data in a moderately fiddly way, but not doing anything too large or fancy.
Actually writing the test cases
This is a complete HTML file that runs two tests for this function:
<meta charset="utf-8">

<script src="code_to_test.js"></script>

<script src="test_micro_framework.js"></script>
<link rel="stylesheet" href="test_micro_framework.css">

<script>
  it('createPublicationYearLabel: a range of years', () => {
    assertEqual(
      createPublicationYearLabel({ afterYear: '2001', beforeYear: '2002' }),
      'published between 2001 and 2002'
    );
  });

  it('createPublicationYearLabel: a single year', () => {
    assertEqual(
      createPublicationYearLabel({ afterYear: '2001', beforeYear: '2001' }),
      'published in 2001'
    );
  });
</script>
The character encoding in <meta charset="utf-8"> makes the tick/cross characters look nice in the rendered output.
Then I load the file which contains the functions I want to test, and the helpers functions/styles for my testing framework.
Finally, I define my test cases in a <script> tag, creating a new test case by calling the it() function. This function takes two arguments: a string which describes the test, and a callback function which contains the body of the test. When I open this file in a browser, the test cases get run in order, and the results appear in the rendered document.
Let’s see how that it() function works, by looking in test_micro_framework.js:
function it(description, body_of_test) {
  const result = document.createElement('p');
  result.classList.add('test_result')

  try {
    body_of_test();
    result.classList.add('success');
    result.innerHTML = description;
  } catch (error) {
    result.classList.add('failure');
    result.innerHTML = `${description}<br/><pre>${error}</pre>`;
  }

  document.body.appendChild(result);
}

function assertEqual(x, y) {
  if (
    x === y || (
      typeof x === 'object' &&
      typeof y === 'object' &&
      x.length === y.length &&
      x.every((element, index) => element === y[index])
    )
  ) {
    return;
  } else {
    throw new Error(`${x} != ${y}`);
  }
}

function assertTrue(x) {
  assertEqual(x, true);
}

function assertFalse(x) {
  assertEqual(x, false);
}
The it() function wraps the body of the test in a try … catch block. If the block succeeds, the test passes; if the block throws an exception, the test fails. To show me the result, it creates a new <p> element and inserts it in the body of the document. Here’s an example of what a successful/failed test look like in the HTML it creates:
<p class="test_result success">
  createPublicationYearLabel: published before
</p>

<p class="test_result failure">
  createPublicationYearLabel: current year<br>
  <pre>Error: published after 2022 != published in 2022</pre>
</p>
The reason I’m inserting HTML instead of using console logging (even though I can do formatting in the console) is that it’s just a bit easier to see – I only need a browser, I don’t access to dev tools. I haven’t written much JavaScript on my phone, but it is occasionally useful.
I’ve also written a couple of assertion helpers, like you get in a proper test framework.
The test results are then styled with a smidgen of CSS in test_micro_framework.css, which just adds a splash of colour and the tick/cross symbol:
.test_result {
  margin: 0;
}

.success { color: green; }
.failure { color: red;   }

.success::before { content: '✔ '; }
.failure::before { content: '✘ '; }
This is the entirety of my test framework (if you can even call it that!).
If you’d like to see what it looks like running, here’s the test suite from the screenshot above.
This isn’t an original idea – I’m sure I’ve read articles about similar techniques, and while researching this post I even discovered QUnit, a test framework that can run in the browser.
The reason I didn’t use any existing solutions (or even think to look for them) is because this was a comparatively simple problem. The vanilla JS I write isn’t complicated, and it doesn’t need a complicated test framework. I probably took less than 10 minutes to write this framework, if you can even call it that. But it does the job – it’s caught several bugs, and it gives me peace of mind when I return to long-forgotten projects.