Creating coloured bookshelf graphics in Rust
In my last post, I mentioned I have a mini-site where I track the books I’ve been reading (books.alexwlchan.net). It’s mostly meant for my personal use, which is why I don’t talk about it much – but I do want to talk about one of its design elements.
At the top of each page is a header that looks like a gravity-defying bookshelf. It’s made up of coloured rectangles arranged in a line, which are meant to look like the spines of books:

Every page on the site has a different-coloured shelf, to match the cover of the book on that page. For example, these shelves come from books with a red cover, a yellow cover, and a blue cover.
I recently rewrote the code that generates these shelves to use Rust, both for fun and as a learning exercise. In this post, I’m going to explain how the new code works.
You may not want to generate these exact images, but the ability to generate graphics like this has been useful in lots of projects – consider this a primer in creating simple images.
Choosing the main colour of the shelves
Given the cover of a book, how do I decide what colour I should use for the shelves?
This is a problem I’ve solved before: I use my dominant_colours tool to extract the main colours from the book cover, and I choose the one that I think will look best. Typically I pick a bold or striking colour, not a black or a grey. If you’re curious how that process works, check out my explainer post about k‑means colouring.
That gets me a primary colour, like █ #917546. Once I have that colour, I generate lots of colours that look similar – I’ll explain how that works later.
Creating an empty image
To work with images in Rust, we can use the image crate.
Within the image crate, an in-memory image is stored in an ImageBuffer. This struct holds the width, the height, and all the pixels. Different instances of ImageBuffer can hold different types of pixels, like RGB, RGBA, or grayscale.
We create a new ImageBuffer by passing the width and the height. For example, to create an image which is 200 pixels wide and 100 pixels tall:
use image::{ImageBuffer, Rgba};

fn main() {
    let img: ImageBuffer<Rgba<u8>, Vec<u8>> = ImageBuffer::new(200, 100);

    img.save("out.png").unwrap();
}
The type hint tells the compiler that this instance of ImageBuffer should have RGBA pixels. (I want RGBA because I want anything not part of the bookshelf to be transparent.)
The crate includes some aliases for creating ImageBuffer instances with commonly used pixel types, so we can simplify this:
use image::RgbaImage;

fn main() {
    let img = RgbaImage::new(200, 100);

    img.save("out.png").unwrap();
}
But the empty image this creates isn’t very interesting!
Drawing some simple shapes
To draw shapes on the image, I turned to the imageproc crate. This builds on the image crate to add all sorts of helpful functions, and of particular interest here is the drawing module.
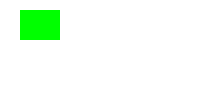
For example, let’s draw a green rectangle using draw_filled_rect. We pass the image we’re modifying, the rectangle we want to draw, and the colour. The function returns the new image.
use image::{RgbaImage, Rgba};
use imageproc::drawing::draw_filled_rect;
use imageproc::rect::Rect;

fn main() {
    let img = RgbaImage::new(200, 100);

    // (0, 255, 0) = #00ff00 = green
    // The final '255' is the alpha value = fully opaque
    let green = Rgba::from([0, 255, 0, 255]);

    // A rectangle whose upper-left corner is at (20, 10), which is
    // 40 pixels wide and 30 pixels tall.
    //
    // The origin is the top left-hand corner, and coordinates
    // increase as you move right and down.
    let rect = Rect::at(20, 10).of_size(40, 30);

    let new_img = draw_filled_rect(&img, rect, green);

    new_img.save("out.png").unwrap();
}
Here’s what the result looks like:
You can also modify the image in-place by making it mutable, and using draw_filled_rect_mut:
...
use imageproc::drawing::draw_filled_rect_mut;

fn main() {
    let mut img = RgbaImage::new(200, 100);

    ...

    draw_filled_rect_mut(&mut img, rect, green);

    img.save("out.png").unwrap();
}
The imageproc documentation doesn’t explain when you should use which function, but we can see the difference by looking at the code. For example, draw_filled_rect copies the image into a new buffer, then calls draw_filled_rect_mut. This means the in-place version is more efficient, because you don’t have to copy the image first – but you lose the previous version of the image.
For the rest of this post. I’m going to use the in-place function, because I’m building up a single image. I don’t care about keeping previous versions of the image.
Here’s one more example, drawing multiple shapes on a canvas:
use image::{RgbaImage, Rgba};
use imageproc::drawing::{
    draw_filled_circle_mut,
    draw_filled_rect_mut,
    draw_polygon_mut,
};
use imageproc::point::Point;
use imageproc::rect::Rect;

fn main() {
    let mut img = RgbaImage::new(200, 100);

    let green     = Rgba::from([0, 255, 0, 255]);
    let turquoise = Rgba::from([0, 255, 255, 255]);
    let pink      = Rgba::from([255, 0, 255, 255]);

    draw_filled_rect_mut(
        &mut img, Rect::at(20, 10).of_size(40, 30), green
    );

    draw_filled_circle_mut(&mut img, (60, 70), 15, turquoise);

    draw_polygon_mut(
        &mut img,
        &[Point::new(100, 50), Point::new(100, 100), Point::new(120, 50)],
        pink
    );

    img.save("out.png").unwrap();
}
Without looking at the result, can you guess what this looks like?
Choosing the rectangle sizes
Now I can draw a single rectangle, I want to draw lots of rectangles. Each of these will start from the top edge, have a random width and height, and they’ll keep going until they fill the entire image.
Let’s start by sketching out an API for generating rectangles:
use std::ops::Range;

struct RectangleOptions {
    width: Range<u32>,
    height: Range<u32>,
    total_width: u32,
}

fn generate_rectangles(options: RectangleOptions) -> Vec<Rect> {
    ...
}

let rectangles = generate_rectangles(
    RectangleOptions {
        width: (5..30),
        height: (60..90),
        total_width: 500,
    }
);
I’ve got a function generate_rectangles() that creates a list of rectangles. It takes a bound on the width and height of individual rectangles, and the total width of the image.
I’m passing the options as a struct because it’s the best way to do named arguments in Rust. The alternative would be to pass the values as parameters to the function, which leads to code like this:
generate_rectangles((5..30), (60..90), 500)Much less clear!
Originally I had individual struct fields for min/max width and min/max height, but I refactored it to use a Range<u32>. It expresses the data in a more succinct way, and it’s similar to the API for generating random ranges.
Now let’s fill in the body of the function:
use rand::Rng;

fn generate_rectangles(options: RectangleOptions) -> Vec<Rect> {
    let mut result = Vec::new();
    let mut rng = rand::thread_rng();

    let mut x_coord: u32 = 0;

    while x_coord < options.total_width {
        let width  = rng.gen_range(options.width.start..options.width.end);
        let height = rng.gen_range(options.height.start..options.height.end);

        let rect = Rect::at(x_coord as i32, 0).of_size(width, height);
        result.push(rect);
        x_coord += width;
    }

    result
}
We start with an empty Vec and a random number generator (RNG).
On each iteration of the while loop, we generate a rectangle. The gen_range function generates a random value for the width/height of the rectangle, within the range we’ve given. These values are used to create the next rectangle, which is appended to the result Vec.
The x_coord variable tracks how far along we’ve moved. We increase it with each new rectangle we add, so all the rectangles are precisely touching but never overlapping. When we’ve moved beyond the width of the image, we’re done.
This is what the output looks like:
[
  Rect { left: 0,  top: 0, width: 25, height: 66 },
  Rect { left: 25, top: 0, width: 20, height: 85 },
  Rect { left: 45, top: 0, width: 25, height: 68 },
  ...,
]
I’m sure there’s a clever way to do this with functional programming that doesn’t involve two mutable variables, but I like this approach because it’s simple. I can see what this is doing, and it’ll still make sense to me when I have to re-read this code.
Actually drawing the rectangles
We can combine what we’ve done so far to draw some black rectangles:
fn main() {
    let width = 500;
    let mut img = RgbaImage::new(width, 100);

    let black = Rgba::from([0, 0, 0, 255]);

    let rectangles = generate_rectangles(
        RectangleOptions {
            width: (4..28),
            height: (60..90),
            total_width: width,
        }
    );

    for r in rectangles {
        draw_filled_rect_mut(&mut img, r, black);
    }

    img.save("out.png").unwrap();
}
Here are a few examples, which look close to what we want:


Notice that each shelf has a different shape, because we’re using thread_rng(), which gives different output every time. That’s fine for certain use cases, but I want the shelf to be the same shape on every page – so the colour changes as you move from page to page, but the shelf has the same outline. I want an RNG that gives consistent output.
I can get a consistent shape by replacing thread_rng() with a seeded RNG. Using a seeded RNG with a fixed seed means the random number generator becomes deterministic, and returns the same results each time.
use rand::prelude::*;
use rand_pcg::Pcg64;

fn generate_rectangles(options: RectangleOptions) -> Vec<Rect> {
    let mut result = Vec::new();
    let mut rng = Pcg64::seed_from_u64(0);

    ...
}
This gives me a predictable set of rectangles, which always look the same. Next: adding colour!
Choosing the colours
I wanted to choose colours that looked similar to the tint colour of the book cover, but not exactly the same. The “shelves” made of monochrome black rectangles above don’t look much like shelves, because you can’t see the difference between individual “books”.
What I wanted to do was take the tint colour, and create lighter and darker shades. That’s tricky if you’re using the RGB colour model, but much easier if you use HSL (hue, saturation, lightness). If we fix the hue and saturation but vary the lightness, we get different shades.
There’s a Rust crate called palette that seems to have pretty good support for colour calculations. I’ve only used a little bit of it so far, but I like what I see, and it let me generate random colours pretty easily. Here’s what that looks like:
use palette::{FromColor, Hsl, Srgb};
use palette::rgb::Rgb;

fn generate_colour_like(base: Srgb<f32>) -> Srgb<f32> {
    let hsl: Hsl = Hsl::from_color(base);
    let mut rng = rand::thread_rng();

    // The choice of 3/4 and 4/3 is pretty arbitrary -- I chose some
    // numbers that looked okay, and I haven't had reason to think
    // about it further.
    let min_lightness = hsl.lightness * 3.0 / 4.0;
    let max_lightness = hsl.lightness * 4.0 / 3.0;

    let new_lightness = rng.gen_range(min_lightness..max_lightness);
    let new_hsl = Hsl::new(hsl.hue, hsl.saturation, new_lightness);

    Rgb::from_color(new_hsl)
}
The crate handles all the conversions between different colour spaces, so I can convert my RGB colour into HSL, choose the new lightness with gen_range(), then convert it back to RGB.
For example, if I run it repeatedly against █ #d01c11, the tint colour for this blog, I get this output:
█ Rgb { red: 0.9332129,  green: 0.22605559,  blue: 0.18284044,  standard: PhantomData }
█ Rgb { red: 0.8556082,  green: 0.11517802,  blue: 0.06992951,  standard: PhantomData }
█ Rgb { red: 0.82863057, green: 0.11154642,  blue: 0.067724615, standard: PhantomData }
█ Rgb { red: 0.7278998,  green: 0.097986504, blue: 0.059491813, standard: PhantomData }
█ Rgb { red: 0.9251349,  green: 0.13244599,  blue: 0.084003896, standard: PhantomData }
There’s a definite variation, but they’re all shades of the same red.
You could get more variation by increasing the min/max lightness you allow – there’s nothing special about the numbers I picked.
Putting it all together
We take the for r in rectangles loop we used above, and now we call generate_colour_like() on each iteration of the loop. That gives us a colour for that individual rectangle. We need to do a bit of work to convert the palette colour into an image colour, but once that’s done we pass it to the draw() method:
fn main() {
    ...

    // #d01c11
    let base_colour = Rgb::new(0.81568627, 0.10980392, 0.06666667);

    for r in rectangles {
        let colour: palette::Srgb<f32> = generate_colour_like(base_colour);

        let colour: image::Rgba<u8> = Rgba::from([
            (colour.red   * 255.0) as u8,
            (colour.green * 255.0) as u8,
            (colour.blue  * 255.0) as u8,
            255
        ]);

        draw_filled_rect_mut(&mut img, r, colour);
    }

    ...
}
And here’s an example of what it looks like:

If you want to get the final code, you can download this zipfile, which is a complete Rust project:
I’ve been making graphics like this for over five years, and it’s as fun now as when I started. I enjoy taking an idea (can I arrange coloured rectangles to look like a bookshelf?) and turning it into an endless collection of similar images. Given how much of my computing life is spent on work, productivity and business, it’s nice to make things that just look pretty.